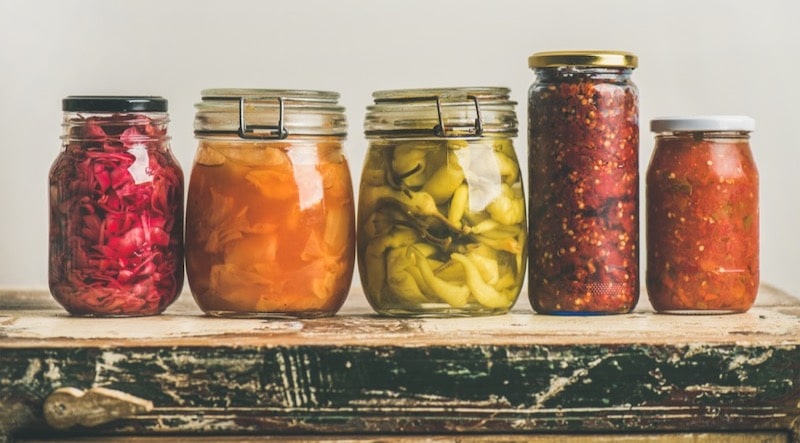
Canning and jarring are great methods of storing and preserving food for the long term. Often, people want to get involved in canning and jarring after they taste something reminding them of home. This might be a homemade spread or pickled cucumbers. When someone is interested in canning and jarring, it is important to learn how to do so properly. While the ultimate goal is to generate great-tasting foods, vegetables, preserves, and other homemade goods, it is also important to think about safety as well. Below is our comprehensive guide to canning and jarring to help anyone get started.
What We'll Cover
- Proper Canning Prevents Recontamination
- An Overview of the Types of Canning
- The Mechanics of the Canning Process
- The Equipment Needed to Carry Out the Canning Process
- Preparing the Jars for the Canning Process
- Filling the Jars with the Product
- Processing the Filled Jars and Product
- Common Problems During the Canning and Jarring Process
- The Joys of Canning and Jarring
Proper Canning Prevents Recontamination
After the cooking process is finished, the next step is to eat the food and save what’s left. The goal of canning is to take food and place it in closed gas at high temperatures. By using high temperatures, the heat will prevent the natural process of spoiling by destroying potential contaminants, saving it for later. Furthermore, the process of vacuum-sealing the jars will prevent contaminants from growing later by sucking the air out of the jar. There are a few different types of canning and jarring to preserve foods properly for the long-term.
An Overview of the Types of Canning
There are two separate methods people can use to can foods and preserves at home. Understanding an overview of the two separate processes will help people choose the right process for the foods preserved inside.
The Water Bath Canning Method
The water bath canning method uses a lower temperature canning method. This type of canning method is great for foods with high degrees of acid inside. Using both time and temperature, mold, yeast, enzymes, and other contaminants are destroyed while the vacuum seal prevents contamination from happening in the future. Some of the foods preserved using water bath canning include:
- Fruits such as apples, pears, peaches, and oranges
- Fruit juices such as apple, grape, orange, and other homemade fruit beverages
- Jams and jellies
- Salsa, particularly spicy types
- Tomatoes
- Pickles
- Relishes
- Anything with vinegar
- Certain types of condiments
- Pie fillings, chutneys, and other sauces
These foods have high acid contents, which can be preserved well using the water bath canning method.
The Pressure Canning Method
Foods without a high acid content are at a higher risk of spoiling more quickly. Therefore, they need to use a high-temperature canning process (over 240 degrees Fahrenheit) to effectively preserve these foods. This method will use both time and an extreme temperature to destroy the bacteria present in the foods. Then, a vacuum seal will be created to preserve these foods. Some of the food items that can be preserved using the pressure canning method include:
- Non-acidic (non-spicy) types of salsa
- Meat and poultry items
- Vegetables such as broccoli, green beans, peas, and more
- Chili
- Seafood such as shrimp, fish, crab, and more
These foods do not have high acid contents and, therefore, require a higher temperature to be preserved effectively. Once people understand the reasons behind the different types of canning, the next step is learning how to carry them out.
The Mechanics of the Canning Process
Even though the food production service has caused a steep drop-off in the canning process, there are still people who are interested in learning this important art. The goal of the canning process is to create an environment to completely remove any chance of contamination. In order to do this, heat is used to kill contaminants and a vacuum process is used to remove air required for organisms is survive. Once someone fills a can or jar with the prepared food, a flat lid and threaded ring will be used to place the jar into boiling water for a certain amount of time.
Then, when the jar is heated to an extreme temperature, it is removed from the jar. The boiling water (and heat) have already killed whatever is present, and then the heat will begin to escape to the colder external environment. As the heat leaves the jar, it takes whatever air is left with it. This creates a vacuum in and around the jar. The vacuum is used to suck the lid down against the can or jar, creating a tight seal. This will prevent bacteria and other contaminants from causing the food to spoil. Fortunately, for those who are looking to learn more about this process, it is relatively straightforward.
The Equipment Needed to Carry Out the Canning Process
The first step in completing the canning process is to collect the necessary equipment. The essentials people are going to need are:
- Tongs: These tongs are going to be used to lift hot, boiling jars and cans out of the water, so make sure these tongs will create a strong grip without dropping the treasured product!
- Funnel: This funnel is going to be used to fill the can and jars. Make sure the funnel has a wide mouth to fit the food, sauce, juice, or jelly through the bottom. A funnel too small might cause it to clog. Find a funnel with a wide mouth.
- Measuring cups: It is important to take proper measurements so the jars and cans aren’t filled to the point of overflowing. The measuring cups should be appropriate for solids and liquids.
- Jar lifter: While this is not essential, this is recommended for people who are going to do large quantities of jarring and canning. This specially designed tool will prevent someone from burning themselves on the hot water.
- Vessel: Finally, it is important to find a pot to be used to carry out the canning process. The vessel should be large, wide, and non-reactive with jars and cans. One of the commonly used items is a deep stockpot. Think about what vessel might be right for this job.
Once all the tools are collected, the process can begin.
Preparing the Jars for the Canning Process
Once the equipment has been collected, the next step is to prepare the jars and cans used to complete the process. In order to properly prepare the jars for this process, there are a few steps that need to be completed. These include:
- Washing the jars: The first step is to wash the jars, lids, bands, and other equipment in hot, soapy water. Then, make sure to rinse the equipment and drain the jars completely. Place the jars on the rack. During this time, fill the canning vessel with water and bring it to a rolling boil. Once the water has started to boil, place the jars on the rack and keep them hot until they’re ready to be filled.
- Heating the lids: While the jars are heating, take the lids and place them in a saucepan. Then, cover the lids with water and bring them to a simmer. Don’t boil the lids, but keep them hot until they’re ready to be used.
- Bands: Keep the screws’ bands in the area. They do not need to be heated or boiled.
Now the equipment is sterilized (using heat), the filling process can begin.
Filling the Jars with the Product
Once the equipment has been sterilized and prepared, the next step is to actually fill the jars. Hopefully, there are already some food or preserves nearby to be used to fill the jars. If not, check out a few popular recipes and try them out. This is a great way to practice the process. Once the recipe has been completed, the next step is to actually fill the sterilized, heated jars.
- Remove the jars: The jars should still be sitting in the heating vessel. Have a rack ready in the working area for the heated vessel. Remove one jar at a time using the jar lifter or tongs. Place the jar in the working area. Use the wide-mouth funnel to carefully fill the jars with the product. Make sure to leave an appropriate amount of space between the product and the top of each jar. There should be about a quarter- to a half-inch of space between the product and the top of the jar.
- Remove the air bubbles: Use a small plastic knife or spatula (non-metal) to remove any air bubbles. Slide it around the hot mixture to get rid of the extra air. Then, take a wet cloth or paper towel and clean the threads and rims of the jar.
- Add the lid: Place the lid on top of the center of each jar. The sealing compound should be in contact with the rims of the jar. Screw the band in place; however, it does not need to be super tight. In order to remove the lids from the hot water, use a magnetic lid lifter.
Repeat this entire process until all the jars are full. After the jars are full, they are ready to be processed and sealed.
Processing the Filled Jars and Product
Once the jars have been filled, it is time to process them appropriately. In order to process the jars, a few steps can be followed. These include:
- Hot water: Take the filled jars and return them to the vessel filled with hot water. Lower the jars into the water to the point there is at least an inch of hot water above the lids of each individual jar.
- Boil: Once the jars are in place, the next step is to bring the water to a full, rolling boil. Once the water has reached a rolling boil, start the timer. Take a look at the recipe and figure out how long the jars need to be boiled to complete the sterilization process.
- Let the jars stand: Once the required time has been reached, turn off the heat. Take the cover off the vessel. Let the jars stand in the water for about five minutes. Then, take the jar lifter and remove the jars one at a time to a rack set to the side. Let the jars cool individually. During this time, do not tilt the jars. Do not try to dry them. Do not touch or disturb the jars in any way. Leave the jars to the side for 24 hours.
- Check the jars: Once the jars have been allowed to sit for 24 hours, inspect the seals and make sure they are tight. If the jars aren’t sealed properly, place them in an indoor or outdoor refrigerator. The process can be repeated by heating the liquid again. Or, the product can be removed and canned in a separate jar, depending on the preference.
- Label the jars: Remember to label the jars with the identity of the product and the date on which they were canned. Store the cans or jars in a cool, dark place to keep them preserved.
These are the steps involved in the canning process. With practice, this process should become second nature.
Common Problems During the Canning and Jarring Process
There are a few common problems people might encounter during the canning or jarring process, including:
- The jars didn’t seal: Sometimes, people get frustrated because their jars didn’t seal appropriately. There might be a few reasons why this happened. First, there might have been some product on the rim, which prevented the lid from creating a tight vacuum seal. Another common reason why the jars don’t seal is there might not have been enough heat in the jar to create a tight vacuum. Think about these common reasons for poor jar sealing.
- Some of the product was lost: Sometimes, the product is lost from the jar during the process. This is called siphoning, which happens when a hot jar changes temperature quickly. The swift cooling process can force some of the product out of the jar. This is normal and only causes a problem if it gets stuck on the room. To reduce the frequency of this problem, remove the trapped air bubbles. Also, let the jars sit in the canner for a little while longer with the lid removed. This will reduce the shock of the temperature change.
The Joys of Canning and Jarring
With this helpful guide, everyone should be ready to try out the canning process with some of their favorite recipes. When this process is performed correctly, the products inside the jars should keep for about a year. This is a great way to store foods, juices, preserves, and more. Those who are having trouble should take a look at a few of the common problems people face during the jarring and canning process. As is frequently said, practice makes perfect, so don’t be afraid to try this process with a few different recipes. When the cans and jars are ready to be consumed, they should taste fresh. In addition, these cans and jars also make great gifts.
The responses below are not provided, commissioned, reviewed, approved, or otherwise endorsed by any financial entity or advertiser. It is not the advertiser’s responsibility to ensure all posts and/or questions are answered.


