
Last Updated on: Jan 25, 2021
There are a lot of elements that go into having a successful camping trip. Packing efficiently for a camping trip includes bringing the right supplies. While a hiking compass might be one of the oldest and most essential tools used by explorers and navigators, it remains one of the most important items to bring camping. A compass is used to communicate pertinent information regarding the direction to the user, and it works by using the magnetic field of the earth to tell the user which direction it is being pointed to.
What We'll Cover
- Identifying the Parts of a Compass
- The Baseplate
- The Rulers
- The Direction of the Travel Arrow
- The Rotating Bezel
- The Index Line
- The Magnetized Needle
- The Orienting Arrow
- The Orienting Lines
- Understanding and Setting Declination Adjustments
- Using Your Compass to Orient a Map
- Lay Out the Map Properly
- Shift the Dial Appropriately
- Place the Compass on the Map
- Turn the Map and Compass
- Understanding Bearings and How to Use Them
- Using a Compass to Navigate Properly
Using a compass, individuals can make important decisions regarding which direction to travel, especially if they are exploring when it gets dark or camping in the rain. A compass can also be used to orient a map, helping the user plan an important journey. In order to properly use a compass, individuals need to know how a compass works. We have put together a helpful guide for you to follow below.
Identifying the Parts of a Compass
A compass uses several parts to function properly. Understanding how these parts work will help you understand how a compass functions. Some of the most important parts of a compass include:
The Baseplate
The baseplate is the hard, flat surface, which is used to mount the compass. The baseplate is typically a sturdy structure because it needs to support the rest of the compass itself in a durable, safe, and reliable manner. Many compasses even come with rulers engraved or attached to the baseplate, helping users measure distances as they read a map. For this reason, the edges of a baseplate are almost universally straight. These straight edges help the user measure distances on a map accurately, helping them plan their journey.
The Rulers
As mentioned above, the rulers of a compass are typically attached to the baseplate. Sometimes, the markings of the rulers are on the back of the baseplate. Depending on where the compass is from, the rulers might come in either standard (using inches) or metric (using centimeters) measurements. Because of their size, compasses rarely contain both standard and metric markings.
Depending on the size of the compass, the rulers will vary in length. Individuals who are looking to use all the features of a compass should take the time to familiarize themselves with the relationship between the rulers of a compass and a map, as they are an invaluable tool.
The Direction of the Travel Arrow
The direction of the travel arrow is one of the most important parts of the compass. This arrow is clearly marked on the baseplate itself. When using a compass, the first step is to point this arrow in the direction you will be traveling. This arrow is used to derive all of the future information from the compass when taking a measurement.
The Rotating Bezel
The job of the rotating bezel is to rotate around the compass needle itself when in use. This bezel has an azimuth ring, which acts as the outer edge. This ring has markings on its side, which help the user decipher the number of degrees, ranging from 0 to 360. These degrees will help someone use the compass to orient a map properly. Furthermore, the rotating bezel also has the four cardinal directions on it: North, South, East, and West. Users should familiarize themselves with the rotating bezel and how it functions.
The Index Line
The index line is the line fixed within the outer edge of the compass housing itself. This line is meant to be lined up with the vertical grid lines placed on the map. Some of these lines are typically colored red because they indicate north. The index line will help the user line the compass up on a map.
The Magnetized Needle
The needle is a piece of magnetized metal. Typically, the needle has one end of it painted red. This end of the needle is used to indicate north, helping the user orient his or herself to the other directions. The needle sits on a fine point, which is almost completely free from friction. The lack of friction is important because it helps the needle rotate without obstruction when the compass is held both level and steady. The magnetized needle is critical for the rest of the function of the compass.
The Orienting Arrow
The orienting arrow is clearly marked on the floor of the compass housing itself. The orienting arrow is designed to rotate with the housing as the dial of the compass is turned. This arrow plays a critical role when someone is trying to orient a map.
The Orienting Lines
The orienting lines are a series of parallel lines present on the floor of the compass housing. These lines are also critical in helping someone line their compass up with a map during the orienting process.
These are most of the important parts someone needs to know as they familiarize themselves with the structure and function of a compass. Knowing these parts is going to help users follow along with the rest of the guide as they learn how to take advantage of all the different features of their compass.
Understanding and Setting Declination Adjustments
A declination adjustment is one of the most important steps users need to take when they put their compass to use. For those who might not know, a magnetic declination (often also called a magnetic variation) is the angle variation between magnetic north and true north. In other terms, magnetic north (in terms of the Earth’s magnetic field) and true north (geographic north as indicated by the north pole) are not always in the same place.
While the compass points at the magnetic north (because it works off a magnetic field), a map points towards true north. Therefore, a declination adjustment needs to be made to rectify this difference. Otherwise, people will not be traveling in the right direction. Declination adjustments are made to prevent this from happening.
Understanding Declination Adjustments
A declination adjustment is made to compensate for the difference between magnetic north and true north. The declination adjustment will be made either to the east or the west of magnetic true north. The direction and the degree to which this adjustment is made is going to depend on someone’s location on Earth. If someone makes a declination to the east, the Earth’s magnetic field at this location points in a direction, which is going to pass by the north pole on the eastern side.
On the other hand, a declination adjustment made to the west means the Earth’s magnetic field, at that location, points in a direction passing by the north pole on the western side. There are points on the Earth where the declination adjustment is so small it might not be needed; however, the declination needs to be considered and performed properly at all times to ensure navigation is being done properly.
How to Set Declination Adjustments
Declination is going to vary depending on someone’s exact location on the globe. Therefore, the first step is to find the declination value for the area. Furthermore, when traveling to a new area to find the best campsite, the declination adjustment will need to be adjusted for that specific area.
Fortunately, topographic maps list declination values in a marked legend; however, try to read a recent topographic map. Declination for a given location can change over time. For the most up-to-date information, rely on the information provided by the National Oceanic and Atmospheric Administration regarding declination. Setting a declination adjustment is going to vary depending on the brand of the compass, but the adjustment is similar for most brands.
First, individuals need to turn their compass over. Then, use the metal key included with the compass and insert it into the adjustment screws. Turn the key until the declination number matches the given number of degrees for that given location. Make sure to adjust it either east or west as appropriate. Some compasses might not require a metal key and instead rely on the pressing of a button on the front, followed by rotating the bezel to adjust the declination.
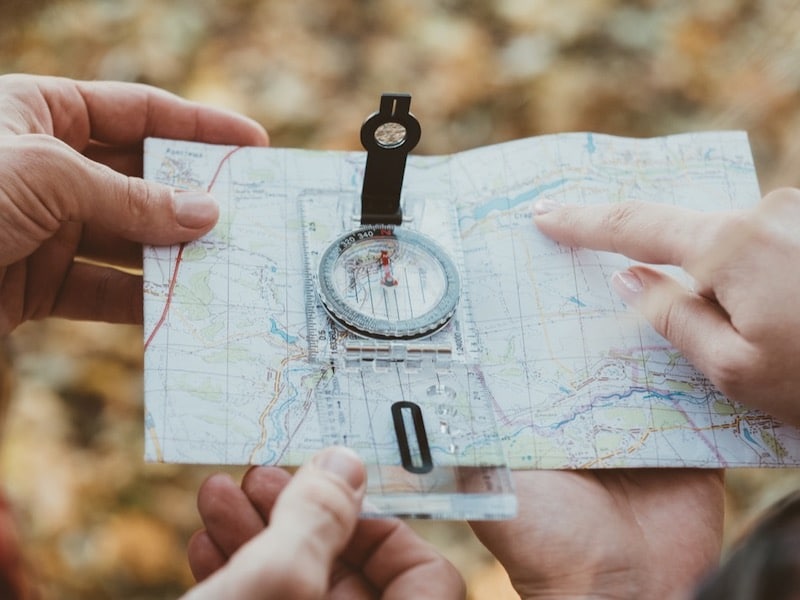
Using Your Compass to Orient a Map
Orienting a map is one of the most important procedures someone can perform using their compass. This turns the compass into not only an important source of information, but also allows the user to derive directions of travel from their map. In order to make the map useful, the compass is used to orient it properly. In order to orient a map using a compass, there are a few key points. These include:
Lay Out the Map Properly
First, unfold the map and make sure it sits on a flat, smooth surface like a camping table. It is important to make sure the map is flat so the relative locations are spaced out appropriately. If the map is crinkled, rolled, or bent, important locations might be hidden. Also make sure you can see the map clearly. If it’s dark outside, use a camping lantern or solar lantern to illuminate your map.
Shift the Dial Appropriately
Then, take the compass. Make sure the compass has been adjusted for the appropriate declination. Otherwise, the map will not be oriented appropriately. Make sure true north is placed at the index pointer on the compass. This is going to help someone orient their map properly.
Place the Compass on the Map
Next, place the compass on the map. Make sure the edge of the compass’s base plate is parallel to the north and south meridians on the map. These meridians should be clearly marked on the map and the edges of the baseplate should be straight, helping the user line up their compass appropriately. The orienteering lines and the arrow marking the direction of travel should all be parallel with the lines of the map. If they aren’t parallel, make sure the map is straight and flat.
Turn the Map and Compass
Finally, with the declination-adjusted compass straight on the map, turn the map and the compass together until the compass needle is “boxed” within the orienting arrow. Those who are experienced travelers often called this placing the “red in the shed.” Once the “red” is in the “shed,” the map is properly oriented and can be used to deliver bearings.
Don’t be afraid to practice this process before heading out on a long journey. Orienting a map is one of the critical skills during a camping or glamping trip, hiking or backpacking adventure, and can even be helpful when camping in your car. It takes some practice; however, with time, it will become a valuable skill and eventually feel like second-nature.
Understanding Bearings and How to Use Them
Bearings are important because they help someone figure out both where they are and where they need to go. When someone is trying to take bearings, there are two common places where someone might not take them from. These include the map and the field.
Taking a Bearing From a Map
First, figure out where you are located on the map and where you would like to go. Then, figure out which way is north on the map. There is a legend that should be helpful, and if the map is properly oriented, this process should be relatively straightforward. Remember just because the text is “up” doesn’t mean the direction is north. Using the compass edge, connect both the current location and the destination.
With the compass in place, twist the compass housing until the lines inside the compass housing are parallel when compared to the lines on the map. The big red arrow in the compass housing should also point north when the process is done. If the big red arrow is not pointing north, make sure the declination adjustment is accurate. Next, take the compass off the map and figure out which number the black line is indicating.
Taking a Bearing in the Field
You might also find yourself in the field wanting to know where you are. First, find a landmark you can find on your map and hold the compass flat. Place the direction of the travel arrow pointing away from you and toward the landmark. Then, rotate the bezel so that the magnetized needle is within the orienting arrow. Use the index line to read the bearing you’ve just taken.
Figuring Out Where You Are
Now, with this bearing, you can figure out where you are. Lay the compass down on the map. Align one of the corners of the compass edge with the landmark you identified earlier. Keep the direction of travel arrow pointed in the direction of the landmark. Then, rotate the compass baseplate until the orienting lines are running in the north/south direction. The north marker on the bezel should also point to the north on the map. Using the straight edge of the compass, draw a straight line. When that line crosses the trail on the map, this is your location.
Using a Compass to Navigate Properly
Following this guide, users should be able to use their compass properly. It is important for everyone to familiarize themselves with the various parts of the compass so they know how it functions. Then, users need to adjust the declination value on their compass to make sure it matches the magnetic variation for a given area. Once the compass has been adjusted appropriately, it can be used to orient a map.
Combined with the map, the compass can help someone figure out their bearings so they can not only figure out where they are, but also where they are headed. This makes a compass one of the oldest, and also most important, navigational tools. Nobody should ever plan a long trip without a reliable and familiar compass.
The responses below are not provided, commissioned, reviewed, approved, or otherwise endorsed by any financial entity or advertiser. It is not the advertiser’s responsibility to ensure all posts and/or questions are answered.
![Tips to Go Camping With a Toddler [Different Weather]](/assets/images/375a17532f44c72a41d33b1008823cf3.png)